
Since I’m working on migrating all my theme settings to the Customizer I thought I’d start a tutorial series on how to create your own settings.
In this tutorial I’m going to be building custom settings into a Twenty Twelve child theme, but of course you can use your own custom theme.
Create the Customizer class file
First thing first: we need to create a new PHP file. This is where we’ll be adding all our code for the Customizer.
I like to put this file inside of /inc/customizer/. It might seem silly to put it in a /customizer/ folder since we only have one file. But I typically go for a subfolder if I’ll be including other custom controls (which I won’t be in this tutorial, but will be showing in later ones).
- Create new file:
/inc/customizer/class-twentytwelve-child-customizer.php - Include the file via functions.php:
/**
 * Include our Customizer settings.
 * Note: If you're using a parent theme, change get_stylesheet_directory() to get_template_directory()
 */
require get_stylesheet_directory() . '/inc/customizer/class-twentytwelve-child-customizer.php';
new Twenty_Twelve_Child_Customizer();
You’ll notice that I created a new instance of the class, so we need to actually create that class in /inc/customizer/class-twentytwelve-child-customizer.php:
<?php

/**
 * Implements Customizer functionality.
 *
 * Add custom sections and settings to the Customizer.
 *
 * @package   twentytwelve-child
 * @copyright Copyright (c) 2016, Nose Graze Ltd.
 * @license   GPL2+
 */
class Twenty_Twelve_Child_Customizer {

	// All our future code will go in here.

}
You don’t have to use a class, but I prefer it since I think it makes things feel a bit more organized.
Hook into customize_register
Inside of our class, let’s build out the constructor. The constructor only needs to do one thing: hook into the customize_register action.
/**
 * Twenty_Twelve_Child_Customizer constructor.
 *
 * @access public
 * @since  1.0
 * @return void
 */
public function __construct() {

	add_action( 'customize_register', array( $this, 'register_customize_sections' ) );

}
This references a method called register_customize_sections() so let’s create that next. This is where we’ll be creating new sections (and panels, if applicable) in the Customizer page.
register_customize_sections()
Let’s get started by creating the method and adding our first section. Here’s how it looks:
/**
 * Add all sections and panels to the Customizer
 *
 * @param WP_Customize_Manager $wp_customize
 *
 * @access public
 * @since  1.0
 * @return void
 */
public function register_customize_sections( $wp_customize ) {

	/*
	 * Add Sections
	 */

	// New section for "Layout".
	$wp_customize->add_section( 'blog_layout', array(
		'title'    => __( 'Blog Layout', 'twentytwelve-child' ),
		'priority' => 101
	) );

}
We use the $wp_customize object to add sections, panels, and settings (we’ll be doing that later). The add_section() method takes two parameters:
- An ID for the section (in my case,
'blog_layout'). - An array of arguments. Including:
'title'— Title of the section.'description'— If you want a description to appear below the title, enter it here.'priority'— This determines how high up on the page the section appears. Lower number = higher up; higher number = towards the bottom.
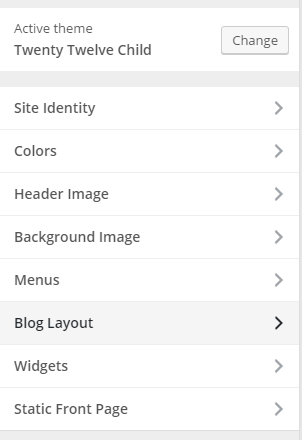
This adds a new section, but if you refresh the page, nothing will actually show up. A section won’t show up until it has at least one setting inside. So let’s do that next.
Right below the panel code we just added (but still inside the register_customize_section() method), add this:
$this->blog_layout_section( $wp_customize );
This calls a new method that we’ll need to do next. I like to split off the settings for each section into their own methods for organizational purposes. So let’s create that next.
Creating your settings
First create the method:
/**
 * Section: Blog Layout
 *
 * @param WP_Customize_Manager $wp_customize
 *
 * @access private
 * @since  1.0
 * @return void
 */
private function blog_layout_section( $wp_customize ) {

    // Code will go in here

}
We’ll be adding all our “Blog Layout” settings inside this method. We’ll need to use that $wp_customize object again, just in a slightly different way.
Checkbox Setting
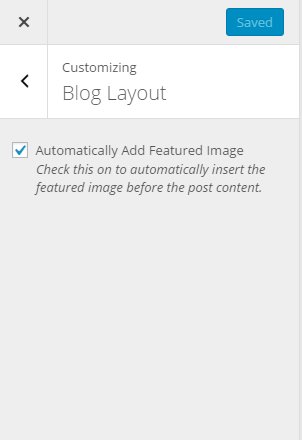
First I’ll be adding a checkbox option. This option will let you decide whether or not you want the featured image automatically inserted before the post content.
A setting has two parts to it:
- A “setting”
- A “control”
We’ll tackle these one at a time. Setting first.
/* Auto add featured image */
$wp_customize->add_setting( 'auto_add_featured_image', array(
	'default'           => true,
	'sanitize_callback' => array( $this, 'sanitize_checkbox' )
) );
This looks similar to add_section(), huh? We have two parameters: an ID and an array of arguments.
The ID is important because you’ll be using it when we add the control and you’ll be using it whenever you want to retrieve the setting from the database.
The array has several possible arguments but we’re only using two right now:
default— The default setting. For a checkbox, this will either betrue(checked on) orfalse(unchecked).sanitize_callback— The name of a function for the input to pass through before it gets saved. In this case we’re passing through asanitize_checkbox()method in this class to make sure only “true” or “false” can be entered. We’ll create this method later.
Now let’s create the control directly below this.
$wp_customize->add_control( new WP_Customize_Control( $wp_customize, 'auto_add_featured_image', array(
	'label'       => esc_html__( 'Automatically Add Featured Image', 'twentytwelve-child' ),
	'description' => esc_html__( 'Check this on to automatically insert the featured image before the post content.', 'twentytwelve-child' ),
	'section'     => 'blog_layout',
	'settings'    => 'auto_add_featured_image',
	'type'        => 'checkbox',
	'priority'    => 10
) ) );
Eeks, a few more settings here.
In the first line, you’ll find that same ID again: auto_add_featured_image. You can swap that out for your own ID. Then we also have an array of arguments:
label— Title of the field.description— Description of the field.section— ID name of the section to put this field in. This is the'blog_layout'section ID we created before.settings— ID of a setting to attach this control to. This needs to be the ID we set inadd_setting()earlier.type— What type of field this is. The WP_Customize_Control documentation has a list of possible fields, including text, checkbox, radio, select, dropdown-pages, and textarea.priority— Just like inadd_section()this controls how far up or down the page the setting gets displayed.
Now let’s go ahead and create a new method for that sanitization callback. This just needs to make sure that we can only accept ‘true’ or ‘false’ as values.
/**
 * Sanitize Checkbox
 *
 * Accepts only "true" or "false" as possible values.
 *
 * @param $input
 *
 * @access public
 * @since  1.0
 * @return bool
 */
public function sanitize_checkbox( $input ) {
	return ( $input === true ) ? true : false;
}
And just to make sure we’re on the same page, here’s my entire class-twentytwelve-child-customizer.php file so far:
<?php

/**
 * Implements Customizer functionality.
 *
 * Add custom sections and settings to the Customizer.
 *
 * @package   twentytwelve-child
 * @copyright Copyright (c) 2016, Nose Graze Ltd.
 * @license   GPL2+
 */
class Twenty_Twelve_Child_Customizer {

	/**
	 * Twenty_Twelve_Child_Customizer constructor.
	 *
	 * @access public
	 * @since  1.0
	 * @return void
	 */
	public function __construct() {

		add_action( 'customize_register', array( $this, 'register_customize_sections' ) );

	}

	/**
	 * Add all sections and panels to the Customizer
	 *
	 * @param WP_Customize_Manager $wp_customize
	 *
	 * @access public
	 * @since  1.0
	 * @return void
	 */
	public function register_customize_sections( $wp_customize ) {

		/*
		 * Add Panels
		 */

		// New panel for "Layout".
		$wp_customize->add_section( 'blog_layout', array(
			'title'    => __( 'Blog Layout', 'twentytwelve-child' ),
			'priority' => 101
		) );

		/*
		 * Add settings to sections.
		 */
		$this->blog_layout_section( $wp_customize );

	}

	/**
	 * Section: Blog Layout
	 *
	 * @param WP_Customize_Manager $wp_customize
	 *
	 * @access private
	 * @since  1.0
	 * @return void
	 */
	private function blog_layout_section( $wp_customize ) {

		/* Auto add featured image */
		$wp_customize->add_setting( 'auto_add_featured_image', array(
			'default'           => true,
			'sanitize_callback' => array( $this, 'sanitize_checkbox' )
		) );
		$wp_customize->add_control( new WP_Customize_Control( $wp_customize, 'auto_add_featured_image', array(
			'label'       => esc_html__( 'Automatically Add Featured Image', 'twentytwelve-child' ),
			'description' => esc_html__( 'Check this on to automatically insert the featured image before the post content.', 'twentytwelve-child' ),
			'section'     => 'blog_layout',
			'settings'    => 'auto_add_featured_image',
			'type'        => 'checkbox',
			'priority'    => 10
		) ) );

	}

	/**
	 * Sanitize Checkbox
	 *
	 * Accepts only "true" or "false" as possible values.
	 *
	 * @param $input
	 *
	 * @access public
	 * @since  1.0
	 * @return bool
	 */
	public function sanitize_checkbox( $input ) {
		return ( $input === true ) ? true : false;
	}

}
If you check out the Customizer, you can now see the settings show up.
Using your custom settings in a theme
You can check or uncheck the checkbox, save, and have the settings automatically saved. But they don’t actually do anything yet. You have to use them in the theme somewhere for them to take effect.
In my case, I need to make sure the featured image doesn’t show up if the checkbox is unchecked. In Twenty Twelve, this is handled in the content.php template file in this line:
<?php if ( ! post_password_required() && ! is_attachment() ) :
	the_post_thumbnail();
endif; ?>
I’m going to copy the entire template into my child theme so I can override it.
To get the value of a setting, you use this code:
$my_setting = get_theme_mod( 'setting_id_here', 'default_value_here' );
So in the case of my checkbox, I’d use this code:
$add_featured_image = get_theme_mod( 'auto_add_featured_image', true );
So inside content.php I can change that post thumbnail code to use this instead:
$add_featured_image = get_theme_mod( 'auto_add_featured_image', true );
if ( ! post_password_required() && ! is_attachment() && $add_featured_image === true ) :
	the_post_thumbnail();
endif; ?>
Or if you want to one-line it, you can use this instead:
<?php if ( ! post_password_required() && ! is_attachment() && get_theme_mod( 'auto_add_featured_image', true ) ) :
	the_post_thumbnail();
endif; ?>
Those end up being the same thing since get_theme_mod( 'auto_add_featured_image', true ) will always return true or false.
If the checkbox is unchecked, then we’ll get false back, the condition will fail, and the the_post_thumbnail() line will never run.
Adding colour pickers to the “Colors” section.
We’ve covered checkboxes, but let’s talk about adding new colour pickers to an existing section, “Colors”.
Head back up to our register_customize_sections() method and tack this onto the end:
$this->colours_section( $wp_customize );
Now let’s create that colours_section() method:
/**
 * Section: Colours
 *
 * @param WP_Customize_Manager $wp_customize
 *
 * @access private
 * @since  1.0
 * @return void
 */
private function colours_section( $wp_customize ) {

	// Settings in here

}
Now let’s add a new colour picker in there, perhaps for changing the colour of the paragraph text.
Our code will look very similar to what it was before, but instead of using WP_Customize_Control, we’ll be using WP_Customize_Color_Control. Here’s how it looks:
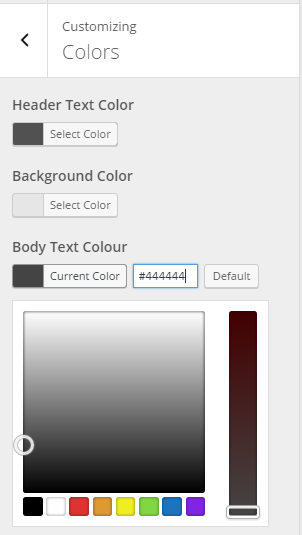
/* Paragraph text */
$wp_customize->add_setting( 'body_text', array(
	'default'           => '#444444',
	'sanitize_callback' => 'sanitize_hex_color'
) );
$wp_customize->add_control( new WP_Customize_Color_Control( $wp_customize, 'body_text', array(
	'label'    => esc_html__( 'Body Text Colour', 'twentytwelve-child' ),
	'section'  => 'colors',
	'settings' => 'body_text',
	'priority' => 10
) ) );
- Set the
defaultto a hex colour value. - Make sure the
sanitize_callbackis set tosanitize_hex_color'— this should always be used for colour pickers. - Make sure the
sectionis'colors'. - Make sure all your setting IDs match up.
If you refresh the Customizer, you’ll see the new setting pop up in the “Colors” section.
But once again, changing the colour value doesn’t actually change anything on the site yet. We have to add in code to make that happen.
First, hop over to functions.php and create a new function.
/**
 * Generate CSS based on the Customizer settings.
 *
 * @since 1.0
 * @return string
 */
function twentytwelve_child_customizer_css() {

	// Our code in here

}
Now we need to get the value of the 'body_text' setting and create CSS from it.
function twentytwelve_child_customizer_css() {

	$css = '';

	$body_text = get_theme_mod( 'body_text', '#444444' );
	$css .= 'body { color: ' . $body_text . '; }';

	return $css;

}
- Use
get_theme_mod()to get the value of the setting. The first parameter is the ID of the setting and the second is your default. - Use that value to generate CSS and append it to the
$cssvariable. return $cssat the end.
This function creates all the CSS, but we still need to add it to the <head> area.
Now, I have a child theme so I have this code in my functions.php file for adding the parent stylesheet:
/**
 * Add the parent Twenty Twelve stylesheet to the front-end.
 *
 * @since 1.0
 * @return void
 */
function twentytwelve_child_enqueue_css() {
	wp_enqueue_style( 'twentytwelve-parent', get_template_directory_uri() . '/style.css', array(), '1.0' );
}

add_action( 'wp_enqueue_scripts', 'twentytwelve_child_enqueue_css' );
I just need to add an extra line below wp_enqueue_style() like this:
wp_add_inline_style( 'twentytwelve-parent', twentytwelve_child_customizer_css() );
The first parameter is the ID of the stylesheet. You can change this to match your own. The second parameter is the name of the CSS function we just created.
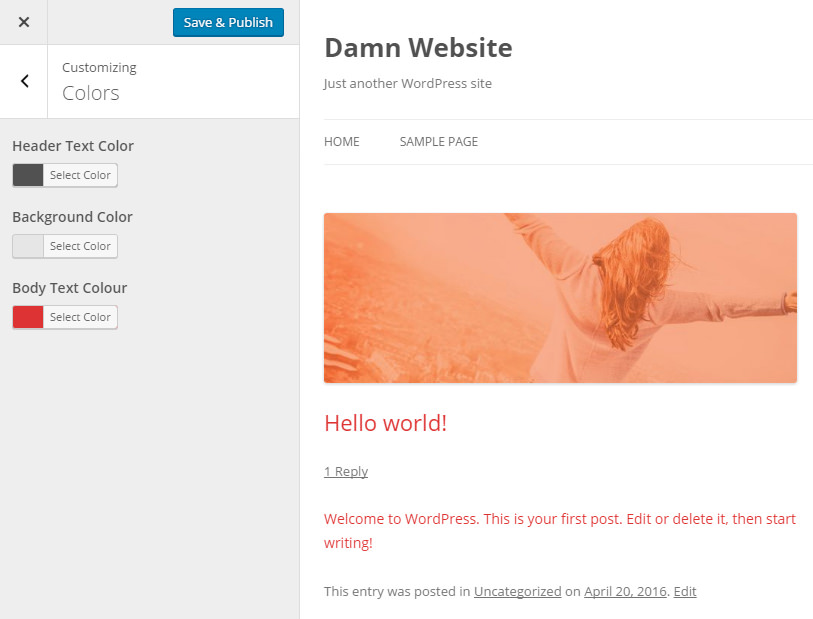
Now you can go ahead and change colours to your heart’s desire:
Download my Twenty Twelve child theme
If you want to see my finished code, you can download my Twenty Twelve child theme. This contains all the code we’ve gone over in this tutorial.
Welp, you read my mind! I actually thought to myself the other day that I wish you would make a tutorial on this because I couldn’t quite figure it out from the other ones I’ve read. Thank you so much!
You’re welcome! 🙂 I have more advanced Customizer tutorials coming up later!
Hey Ashley,
Thank you a big big time !!!
I was looking for something like this for so long. How came I have not seen this post yet?? You are in my bookmark now (y) Thank a million zillion trillion times!!
Thanks for the valuable
input about using customizer to add settings to your wordpress theme. I will follow these tips.
Your expertise always helps me tremendously.
Thank You.. 🙂
You’re so welcome! 🙂
Maybe I am living under a rock, but what is this customizer thing?
Appearance > Customize. 😉 It’s the settings panel that’s already built into WordPress. All themes in the WordPress.org repository are required to build their theme settings into that rather than creating their own custom “Theme Options” page (as Tweak Me v2 does).
Your tips sound really very helpful to the WordPress developers. Though, I am not a developer, but sometimes I have to customize the WordPress themes. Hope this article will help me.
So, I want to add another property to the colors section. I want to be able to change the background color of the .site-title class. I thought I was doing it right, but I’m not sure, because it’s not working.
You simply have to adjust the CSS to change the background colour. Example:
$site_title_bg = get_theme_mod( 'site_title_bg', '#444444' ); $css .= '.site-title { background: ' . $site_title_bg . '; }';*sigh* – thank you. I was missing a “.” That’s all. It’s always something…
I have a different question now. How would I _remove_ a theme customizer option… or at least rename it. For example, in twenty twelve, there’s an option for customizing the header text color. At the very least, I want to rename that to “Site Title Color.” Ideally, I’m trying to set up a system where the user selects 3 colors, and they populate various CSS parameters of the site (one of which would be site title). I think I know how to do that once the colors are selected, but if that Header Text Color option is in the Colors section, it would be confusing.
Did you get the answer Sue? I’m also having the same question, and can’t find answer for changing parent’s section name or description from child theme. I hope you can help me 🙂
Very helpful, very easy to understand, thank you and love your tut so much.
Hi and thanks for a nice turtorial, I can see you have great UX approach and inviting logic in this post. (Maybe we need more girl-power on the web). As a developer from the WordPress beginning, I can see that the customizer API is gonna explode, and we can use the API in many areas, not only layout purposes.
I was google around to find a simple answer of the ‘sanitize_callback’ called within a plugin. Many fancy topics about the customizer in search results only uses the Theme functions.php to implement the code.
You actually go straight forward and show us how to use the customizer within a class. Thats pro!
Thanks, and keep posting, I will follow!
Well, this article is certainly badass. Thanks a lot. I’m using a lot of this already but there are a few items like sanitizing that I need to implement to do it properly : ))) you go with your girl powered coding genius