
The WordPress visual editor applies styles to certain formats… like headings:
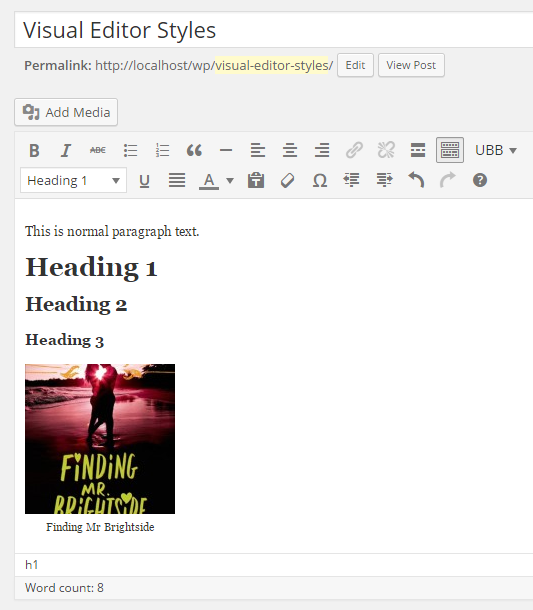
That’s not very pretty, is it?
What if you could make those styles actually match your theme? This would make the visual editor look more like a real preview of your post.
YOU CAN!
Step 1: Create the Stylesheet
Inside your theme folder, create a new CSS file called editor-style.css
This is where you’ll be putting all of your custom CSS. You can even import Google fonts using the @import feature. Here’s an example of what mine might look like:
/* Import Google Fonts */
@import url(http://fonts.googleapis.com/css?family=Playfair+Display:400,700,400italic,700italic);

/* Set the visual editor width to the width of my blog content area */
body {
    max-width: 683px;

    /* This is also where you can edit the paragraph text. Uncomment to use:
     * color: #222;
     * font-family: Arial, sans-serif;
     * font-size: 15px;
     */
}

/* Style heading tags */
h1, h2, h3, h4, h5, h6 {
    color: #ff7878;
    font-family: 'Playfair Display', 'EB Garamond', Georgia, serif;
    font-weight: normal;
    line-height: 1.1;
}

/* h1 */
h1 {
    color: #6B6B6B;
    font-size: 36px;
    margin: 0 0 5px;
    text-align: center;
}

/* h2 */
h2 {
    background: #ffe1e3;
    border: 4px double white;
    color: #6B6B6B;
    font-size: 30px;
    margin: 20px 0 20px;
    padding: 5px;
    text-align: center;
}

/* h3 */
h3 {
    border-bottom: 4px solid #efebe8;
    color: #546164;
    font-size: 24px;
    margin: 0 auto 15px;
    padding-bottom: 5px;
}

/* Captions */
.wp-caption {
    background: #efebe8 !important;
    padding: 5px !important;
}
Okay, so you’ve added your stylesheet. Now what? How do we get it to show up?
Step 2: Editing your functions.php file
In order to get WordPress to recognize your custom stylesheet, you have to tell WordPress it exists. To do that, you have to add a code snippet to your theme’s functions.php file:
function my_theme_add_editor_styles() {
    add_editor_style();
}
add_action( 'after_setup_theme', 'my_theme_add_editor_styles' );
That’s it!
Here’s how my example looks:
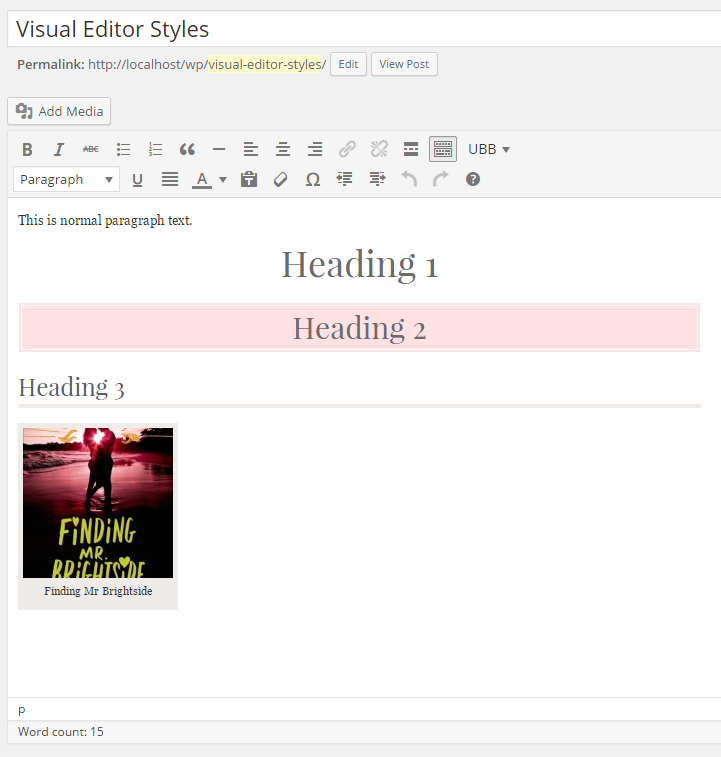
I think this feature is pretty under-utilized, but it’s certainly a nice one. I think it’s particularly great for clients who really like a more accurate “what you see is what you get” experience.
Good to know. Thanks!
This’ll come in handy in the future. Thanks! 😀
Super handy! I never even knew this was a feature! Cheers for sharing! 🙂 x
This looks like chinese to me but bookmarking just in case 🙂
That’s brilliant! Thanks for sharing.
I did this a while back – when I discovered that using blockquotes wasn’t actually the way to stylize headings lol – and I’m so glad I did. Nothing too complex, but some nice borders that make it look much nicer.
I will totally be doing this. And probably emailing for help in a panic if I mess it up. 🙂
This is amazing! I’ve been looking for something like this for so long, it’s not even funny. You truly are a goddess. I am starting to regret going into Law. I should have pursued a degree in web design (I think?) !
I’m so glad this was useful for you! 😀
This is awesome. I bookmarked this to come back to and I’d love to put it into practice. Is this possible and/or as easy to do if we’re using Book Host? I’m not very experienced in stuff like this!
This is awesome!! I’m pinning for later, when I get my darn blog back online (overdue, going crazy). This would be WORLDS BETTER than reloading a post preview 900 times to make sure it all looks right.
I just finished doing this today! It looks so cool 😀 Thanks for the tutorial!
You’re welcome. 🙂