
There are three parts to creating your own WordPress widget:
- Creating the form in the admin area, where you enter the widget title and any other settings.
- Coding the part that saves that form data.
- Displaying the actual widget on the front-end of your site.
I’m going to show you the layout and format of these three steps. I can’t cover all of #3 because how you code the part that displays the widget is entirely dependant on what the widget actually does. It’s impossible for me to cover all those bases. That will require some PHP knowledge on your part.
But I can walk you through the general set up of the Widget API and how to put the pieces together.
Create your custom plugin folder and file.
In this example, I’m putting the widget in a custom plugin, which is generally a good idea.
I’ve decided that my widget is going to display the featured image of the current blog post. So, with that information, I’m going to create a new folder called ng-sidebar-featured-image (you can adjust this based on the name of your own plugin), and inside that folder I’m creating a new file called ng-sidebar-featured-image.php.
Here’s what I put at the top of that file:
<?php
/*
 * Plugin Name: NG Sidebar Featured Image
 * Plugin URI: https://www.nosegraze.com
 * Description: Widget that displays the featured image of the current post.
 * Version: 1.0
 * Author: Nose Graze
 * Author URI: https://www.nosegraze.com
 * License: GPL2
 *
 * @package ng-sidebar-featured-image
 * @copyright Copyright (c) 2016, Nose Graze Ltd.
 * @license GPL2+
*/
This is the plugin header. It gives WordPress all the information about the plugin.
Include the widget file.
Next, still inside ng-sidebar-featured-image.php, I’m including a line to include our widget class file. We haven’t created this yet, but we will in a few minutes.
// Include the widget.
include_once plugin_dir_path( __FILE__ ) . 'class-featured-image-widget.php';
This references a soon-to-be-created file called class-featured-image-widget.php.
Register the widget with WordPress.
Next, we have to tell WordPress that our widget actually exists. Here’s the piece of code for that:
// Register the widget with WordPress. Requires PHP5.3+.
add_action( 'widgets_init', function(){
	register_widget( 'NG_Featured_Image_Widget' );
});
The one bit you may want to change is this: NG_Featured_Image_Widget. That’s the name of the widget class file (again, not created quite yet). You may want to adjust the name based on your own widget’s name.
Create the widget class file.
Okay I keep talking about this class-featured-image-widget.php file. This is the file containing the class that creates and powers the widget.
Still inside your main ng-sidebar-featured-image (or whatever) folder, create a new file called class-featured-image-widget.php. This should be the same file name as when we included the file in this line:
// Include the widget.
include_once plugin_dir_path( __FILE__ ) . 'class-featured-image-widget.php';
Inside the file, add this code:
<?php
class NG_Featured_Image_Widget extends WP_Widget {

	/* All code will go in here */

}
This sets up the class for the widget. You can adjust the class name (“NG_Featured_Image_Widget”) if you like. Make sure it matches what we entered here earlier:
register_widget( 'NG_Featured_Image_Widget' );
All of the code to follow is going to go inside this class declaration.
The three steps of a widget.
Okay there are actually four parts here, but I don’t count one of them as a step. Here’s what the general outline of our class is going to look like:
<?php
class NG_Featured_Image_Widget extends WP_Widget {

	/**
	 * Constructor
	 *
	 * Registers the widget with WordPress. Sets up the widget
	 * ID, name, and description.
	 */
	public function __construct() {


	}

	/**
	 * Admin Form
	 *
	 * Displays the form in the admin area. This contains all the
	 * settings for the widget, including widget title and anything
	 * else you may have.
	 */
	public function form( $instance ) {


	}

	/**
	 * Update Values
	 *
	 * Sanitize widget form values as they are saved. Make sure
	 * everything is safe to be added in the database.
	 */
	public function update( $new_instance, $old_instance ) {


	}

	/**
	 * Front-End Display
	 *
	 * Display the contents of the widget on the front-end of the
	 * site.
	 */
	public function widget( $args, $instance ) {


	}

}
This is just the bare bones of what we’ll be creating. There’s no code inside of them yet, but you can see what the steps are:
- Register the widget with WordPress (
__construct) - Show the form in the admin area (
form) - Save the values of the form when the widget is saved (
update) - Display the widget on the site (
widget)
Building out the constructor
First we need to fill out the constructor. This just has a few settings for our widget—mainly the ID, name, and description.
 __( 'Displays the featured image of the current post.', 'ng-featured-image-widget' ), ) // Args
	);
}
- The “base ID” should be a unique identifier for your widget. Use underscores instead of spaces.
- The “name” is the name of your widget as it will appear in the admin panel.
- The “description” is the description that will appear in the admin panel.
Coding the admin form
Right now our form has no fields in it because it’s just an empty method like this:
/**
 * Admin Form
 *
 * Displays the form in the admin area. This contains all the
 * settings for the widget, including widget title and anything
 * else you may have.
 */
public function form( $instance ) {


}
If we were to add the widget to our sidebar, it would look like this:
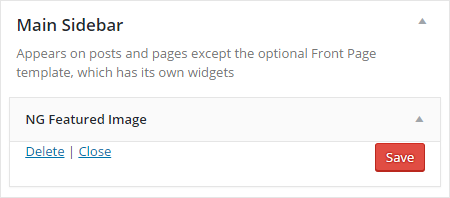
So now we’re going to focus on actually adding fields to the widget. We’ll start out by adding a field that allows people to enter in a widget title.
Here’s the new built-out form method:
/**
 * Admin Form
 *
 * Displays the form in the admin area. This contains all the
 * settings for the widget, including widget title and anything
 * else you may have.
 */
public function form( $instance ) {
	$title = ! empty( $instance['title'] ) ? $instance['title'] : '';
	?>
	<p>
		<label for="<?php echo $this->get_field_id( 'title' ); ?>"><?php _e( 'Title:', 'ng-featured-image-widget' ); ?></label>
		<input class="widefat" id="<?php echo $this->get_field_id( 'title' ); ?>" name="<?php echo $this->get_field_name( 'title' ); ?>" type="text" value="<?php echo esc_attr( $title ); ?>">
	</p>
	<?php
}
First, we get the saved title from the database:
$title = ! empty( $instance['title'] ) ? $instance['title'] : '';
This is a one line if statement that basically says, “If we have a title already saved, assign that to the $title variable. If not, let’s use an empty string as the value instead.”
Next, we write out some HTML to display a <label> and <input> text box. The most important part here is that we use the ID and name values provided by the class, using these pieces of code:
<?php echo $this->get_field_id( 'title' ); ?>
<?php echo $this->get_field_name( 'title' ); ?>
That keyword title should match what we used further up when assigning a value to $title. Notice how we used $instance['title']. Whatever is in those square brackets should match what we pass into get_field_id() and get_field_name().
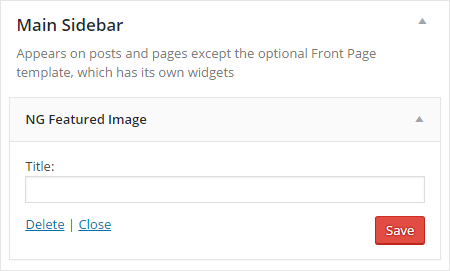
If we were to look at the widget in the admin panel now, we’d actually see our field, like this:
Saving the field data
But if we were to type in a title and save that form, nothing would happen.
Why? Because we haven’t actually coded anything to handle saving that data. That’s what the update method is for. So let’s work on that next.
Here’s the code:
/**
 * Update Values
 *
 * Sanitize widget form values as they are saved. Make sure
 * everything is safe to be added in the database.
 */
public function update( $new_instance, $old_instance ) {
	$instance          = array();
	$instance['title'] = ( ! empty( $new_instance['title'] ) ) ? strip_tags( $new_instance['title'] ) : '';

	return $instance;
}
The update method takes two parameters:
$new_instanceis an array of all the values that were just submitted. They haven’t been checked for security yet.$old_instanceis an array of the old, previously saved values (if they exist).
What we need to do is make sure the data that’s been submitted is safe to be stored, then send it back to WordPress. Here’s the main line of code where that happens:
$instance['title'] = ( ! empty( $new_instance['title'] ) ) ? strip_tags( $new_instance['title'] ) : '';
We give $instance['title'] (again, using that same ‘title’ key as before) a specific value depending on the circumstances.
- If no title has been entered at all, then we just set it to an empty string (
''). - But if a title has been entered, then we strip out all HTML tags from that title using
strip_tags( $new_instance['title'] ).
This is called sanitization. You need to always make sure the data being submitted is safe. You can read more about this in the WordPress Data Validation article. Some useful functions are:
strip_tags()– Remove all HTML and PHP tags.sanitize_text_field()– Strips tags, removes line breaks/tabs/whitespace, and converts single < characters to their entity equivalent.wp_kses_post()– Trips out anything that’s not allowed inside a normal blog post content box. Some HTML is allowed.wp_kses()– Similar to wp_kses_post but you can specify which HTML is allowed yourself.
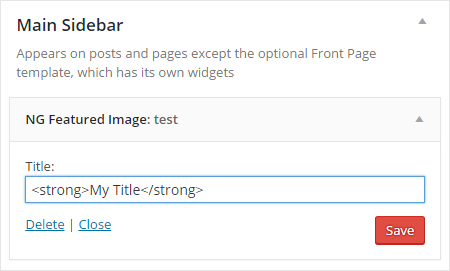
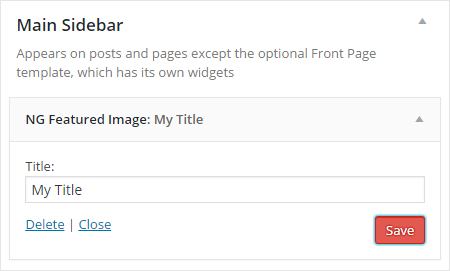
You can see how this works yourself by entering a title like:
<strong>My Title</strong>
Then save the widget. When it refreshes, you’ll see that the <strong> tags are stripped out.
Before sanitization
After sanitization
Display the widget contents
Now it’s the exciting part! Displaying the widget on the front-end of the site.
Once again, if we were to check out our site right now, we wouldn’t see the widget displayed. That’s because we have to add in the code that actually displays it. This happens in the widget method.
Here’s how the main code will look:
/**
 * Front-End Display
 *
 * Display the contents of the widget on the front-end of the
 * site.
 */
public function widget( $args, $instance ) {

	echo $args['before_widget'];

	// Display the widget title.
	if ( ! empty( $instance['title'] ) ) {
		echo $args['before_title'] . apply_filters( 'widget_title', $instance['title'] ) . $args['after_title'];
	}

	// Put your widget code here.

	echo $args['after_widget'];

}
The widget method takes in two parameters:
$args– Contains the settings from when your theme or plugin registered the widget area.$instance– Contains all the values submitted through the form we created.
So the first thing we do is display the 'before_widget' code. When your theme or plugin creates a widget area, it specifies what HTML should be displayed before each widget. This is usually something like:
<div class="widget">
So the first line just displays whatever that HTML is. We also have something similar at the end for displaying the 'after_widget' HTML, which is usually a closing div tag or similar.
The next chunk is for displaying the widget title. First we perform a check to see if something was actually entered in that field:
if ( ! empty( $instance['title'] ) ) {
If so, then we go onto display the contents of the title. We also use $args['before_title'] and $args['after_title'] to display the code that should appear before and after the widget title.
Now where I put the “Put your widget here” comment is where our actual code goes for displaying whatever it is we want to show!
So, remember, my widget is going to display the featured image of the current post. So to do that, I can use a nifty WordPress function called the_post_thumbnail(). Here’s my code for it now:
/**
 * Front-End Display
 *
 * Display the contents of the widget on the front-end of the
 * site.
 */
public function widget( $args, $instance ) {

	echo $args['before_widget'];

	// Display the widget title.
	if ( ! empty( $instance['title'] ) ) {
		echo $args['before_title'] . apply_filters( 'widget_title', $instance['title'] ) . $args['after_title'];
	}

	the_post_thumbnail();

	echo $args['after_widget'];

}
However, in my case I don’t want the widget to show up at all in a few circumstances:
- If we’re not viewing a single blog post.
- If we’re not on a blog post at all (like if we’re on a page instead).
- If the post doesn’t have a featured image set.
In those cases, I don’t want the widget displayed. That means no widget title or anything.
We can make that happen! I just need to add a few lines to the top of my code. Here’s the whole thing now:
/**
 * Front-End Display
 *
 * Display the contents of the widget on the front-end of the
 * site.
 */
public function widget( $args, $instance ) {

	// If we're not on a single post, bail.
	if ( ! is_single() || get_post_type() != 'post' ) {
		return;
	}

	// If the current post doesn't have a featured image, bail.
	if ( ! has_post_thumbnail() ) {
		return;
	}

	echo $args['before_widget'];

	// Display the widget title.
	if ( ! empty( $instance['title'] ) ) {
		echo $args['before_title'] . apply_filters( 'widget_title', $instance['title'] ) . $args['after_title'];
	}

	the_post_thumbnail();

	echo $args['after_widget'];

}
The return bit lets us exit out of the function. I just place those inside a few if statements to check for the conditions I mentioned before.
Check out the completed code on GitHub
I’ve added my entire plugin to GitHub if you want to check it out or download it and use it as a plugin. The GitHub code also adds in an extra widget option for selecting the size of the featured image.
OH MY GOD THIS IS WHY WE HIRE PEOPLE. Just kidding. I’m sure this is very informative and walks you through things very nicely (or am i just the lone dumbo stumbling in on a class for smart people?!), but this was all mush to me! But it looks very nicely taught by you, a coding genius! 🙂
HAH!!
This tutorial is definitely for the more tech-savvy peeps who already have a bit of coding experience. 🙂
Fantastic post – This really is your year of sharing the knowledge!!
I’m bookmarking this until I figure out my “shit” (bwahaha) but I have a REALLY dumb question: What are you using to write code in? I know I can do it in Notepad but I won’t have those awesome reference line numbers. I’ve seen Sublime Text for download. Where to even start???
btw – where’s your brit accent??? I expect you to sound funny by May 11th 😉
Thanks Kristin! 🙂
I use PhpStorm for all my code. It’s a fantastic programme if you want to get into more complex WordPress coding (building plugins or themes). It has WordPress integration so it will auto-complete some stuff for you. 🙂
Sublime is also very popular.
No British accent yet!!
awesome work ashley…
it seems much better than youtube toturials…
i will learn from this and start my blog and website soon.
thanks for all the information dear ashley 😛
Thanks for this well written tutorial!!
Thank-you for sharing this interesting tutorial creating widget. I have been implementing a code but i am having some errors. Can you please find me fix the code as i have seen the tutorial https://www.wpblog.com/create-widget-plugin-for-wordpress/
Explanation style is very nice. Everything works fine as described. Full explanation makes it unique. Thank you.