
The Ultimate Book Blogger plugin already has a lot of available fields and is very customizable, but sometimes people have need for a new field that isn’t available in the plugin. I’ll show you how to create your very own add-on plugin with a custom field.
(If it’s not clear, this code requires Ultimate Book Blogger in order to work! It will also only work with the latest version (3.2+)
The four steps for a custom field
There are four steps to creating a new custom book info field:
- Adding a new option in the book information “Configuration” section (Ultimate BB > Book Information > “Configuration” at the bottom). This allows you to enable or disable the field and place it where you want.
- Creating a new box on the Add/Edit Post page where you can enter the value.
- Registering our placeholder shortcode with UBB. This gets swapped out for the real value automatically.
- Displaying the value on the front-end with your review.
This tutorial will walk you through all four steps. All our code will be stored in a new plugin.
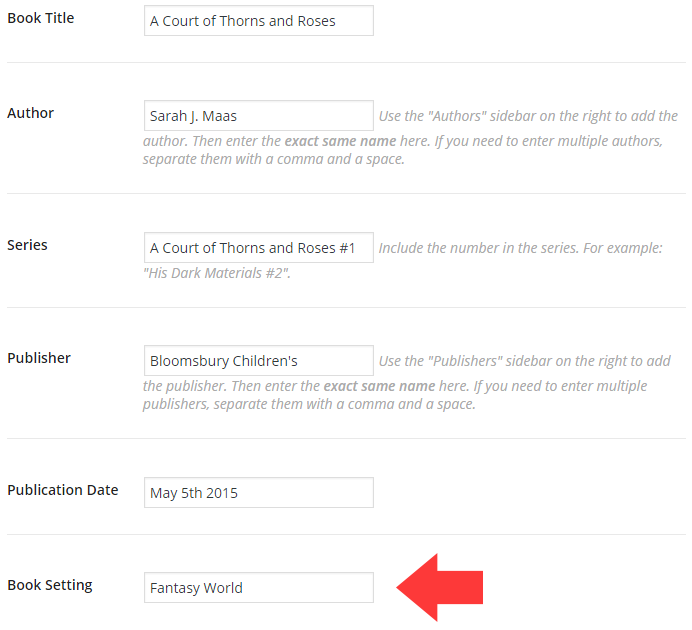
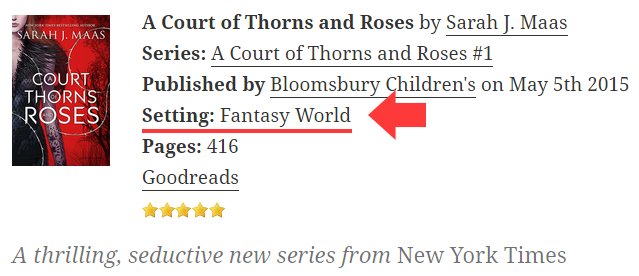
For this example, we’ll be creating a new text field for “Book Setting” (the geographical location the book takes place in).
Create your plugin files.
Create a new folder for your plugin on your computer. I’ll be calling mine ubb-book-setting. Then, inside that folder, create a new PHP file with the same name. Mine is called ubb-book-setting.php. Inside that file, create your plugin header. This gives WordPress information about your plugin.
Here’s mine:
<?php
/*
 * Plugin Name: UBB Book Setting Add-On
 * Plugin URI: https://www.nosegraze.com/create-custom-ubb-plugin-field/
 * Description: Adds a new field for the book setting.
 * Version: 1.0
 * Author: Nose Graze
 * Author URI: https://www.nosegraze.com
 * License: GPL2
 *
 * @package ubb-book-setting
 * @copyright Copyright (c) 2016, Nose Graze Ltd.
 * @license GPL2+
*/
You can edit each field as you see fit (like the plugin name and description).
1) Add a new option to the book info configuration.
Our first real coding step is to add a new option to the book info configuration (pictured below). This will allow you to actually insert the new option into your book info and customize the template for it.
Place this next code after the PHP header (still in the ubb-book-setting.php file).
/**
 * Book Info Configuration
 *
 * Adds a new entry to the book info configuration for book setting.
 *
 * @param array $fields
 *
 * @return array
 */
function ubb_setting_config_option( $fields ) {
	// Change 'book_setting' to whatever you want. No spaces!
	$fields['book-info']['fields']['ubb_sorter']['std']['disabled']['book_setting'] = array(
		'name'  => esc_html__( 'Book Setting' ), // Title of the field
		'desc'  => __( 'Use <code>[setting]</code> to display the book setting.' ), // Description and instructions
		'label' => '<strong>Setting:</strong> [setting] <br>' // Default label (this can be edited in settings later)
	);

	return $fields;
}

add_filter( 'ubb_fields', 'ubb_setting_config_option' );
Here are some notes about what we’ve done here:
Function name
You can change the name of the function to fit your custom field, but these two should be the same, so change them both:
function ubb_setting_config_option( $fields ) {
add_filter( 'ubb_fields', 'ubb_setting_config_option' );
Custom field key
This line contains one value you may want to change (highlighted):
$fields['book-info']['fields']['ubb_sorter']['std']['disabled']['book_setting'] = array(
You’ll want to replace that with a key that represents your custom field. We’ll be using this again later. Your key should be all lowercase and use underscores instead of spaces.
Field name
This line contains the title that will appear in the admin area configuration columns. Change this to be the name of your custom field.
'name' => esc_html__( 'Book Setting' )
Field description
Here we have the description. This is what gets displayed under the title when you click “Edit Text” on the field.
'desc' => __( 'Use <code>[setting]</code> to display the book setting.' )
The description also references the placeholder shortcode [setting]. This is something you can make up. We’ll be making it work later. But you should use all lowercase and hyphens instead of spaces (so [book-setting] is good but Invalid book: 0 is not!).
Default label
This is the default label that will appear in “Edit Text” when the plugin is first installed. But this can always be changed later inside the settings panel.
'label' => '<strong>Setting:</strong> [setting] <br>'
Notice how the placeholder is used in here.
Here’s how it looks!
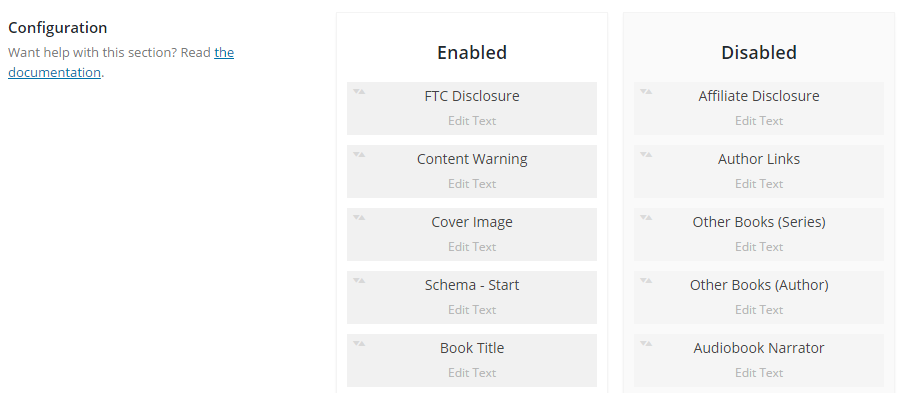
Now don’t go uploading your plugin just yet, but if you were to do so, you’d see your option added to the configuration like this:

Click images to enlarge
2) Adding a new field to the Edit Post page.
We need to add a new text box field to the Edit Post page along with the other book information.
Here’s the code to make that happen. Paste this directly below our previous code.
/**
 * Add Meta Field
 *
 * @param string                      $key          Custom field key name
 * @param object                      $ubb_boxgroup Meta box group object
 * @param int|null                    $group_id     Group ID number
 * @param Ultimate_Book_Blogger_Admin $ubb_admin    UBB admin object
 *
 * @return void
 */
function ubb_setting_meta_field( $key, $ubb_boxgroup, $group_id, $ubb_admin ) {
	if ( $key == 'book_setting' ) {
		$args = array(
			'name' => esc_html__( 'Book Setting' ),
			'id'   => $ubb_admin->prefix . 'book_setting',
			'type' => 'text_medium' // Other choices include: text, select, textarea, checkbox - see https://github.com/WebDevStudios/CMB2/wiki/Field-Types
		);
		do_action( 'ubb_add_metabox', $ubb_boxgroup, $args, $group_id );
	}
}

add_action( 'ubb_display_meta_boxes', 'ubb_setting_meta_field', 10, 4 );
And once again, let’s dissect this a little and figure out what you can edit to make your own.
Function name
Just like before, you can change the function name to match your custom field, but once again, you need to make sure it’s the same in both places.
function ubb_setting_meta_field( $key, $ubb_boxgroup, $group_id, $ubb_admin ) {
add_action( 'ubb_display_meta_boxes', 'ubb_setting_meta_field', 10, 4 );
Checking the field key
On this line, we perform a check for our custom field key. Remember the one we created in the previous step? It needs to be the same here:
if ( $key == 'book_setting' ) {
Edit that to match your own key.
Field title
This is the title that’s displayed on the Edit Post page to let you know what field you’re editing.
'name' => esc_html__( 'Book Setting' ),
Field ID
Each field needs a unique ID. You should swap out ‘book_setting’ with your own. Make sure it’s the same one we’ve been using all along.
'id' => $ubb_admin->prefix . 'book_setting',
Field Type
This is where you specify what type of field should show up. In our example, we’re using ‘text_medium’ for a “medium text box”.
'type' => 'text_medium',
Other options include: text, select, textarea, checkbox, and more. Visit the CMB2 field types page for a full list. Some fields (like select and radio) require extra options. Here’s a quick example for a select box:
$args = array(
	'name' => esc_html__( 'Cover Rating' ),
	'id'   => $ubb_admin->prefix . 'cover_rating',
	'type' => 'select',
	'options' => array(
		'1-star' => esc_html__('1 Star'),
		'2-star' => esc_html__('2 Star'),
		'3-star' => esc_html__('3 Star'),
		'4-star' => esc_html__('4 Star'),
		'5-star' => esc_html__('5 Star')
	)
);
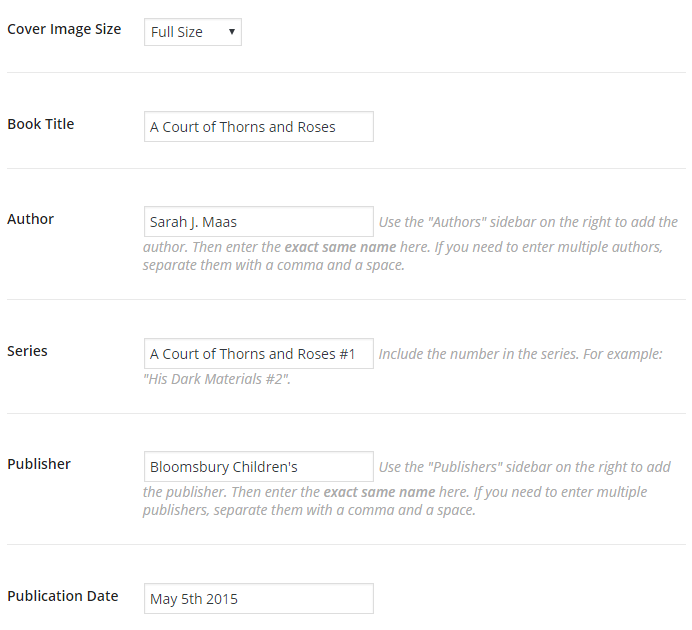
Here’s how it looks!
A quick look at our progress so far…
3) Registering our placeholder shortcode with UBB.
Remember that [setting] placeholder we used inside the field template? We need to register that shortcode with UBB so it knows what to look for.
/**
 * Setting Shortcode
 *
 * Register the [setting] shortcode with UBB and map it to our book_setting key.
 *
 * @param array $shortcodes
 *
 * @return array
 */
function ubb_setting_shortcode( $shortcodes = array() ) {
	$shortcodes['book_setting'] = '[setting]';

	return $shortcodes;
}

add_filter( 'ubb_find_shortcodes', 'ubb_setting_shortcode' );
As before, you’re welcome to change the function name in both places.
There are only two areas you will need to edit here:
$shortcodes['book_setting'] = '[setting]';
Highlighted above is the custom field key that we’ve used several times already. Swap that out for your own.
$shortcodes['book_setting'] = '[setting]';
Highlighted above is the placeholder shortcode. This is what you set in the first step when adding the field to the configuration. Add the same shortcode here.
4) Retrieving the saved value to display on the front-end.
This last step brings everything together and will allow your custom field to show up on the front-end of your site with the other book info.
/**
 * Get Value
 *
 * Gets the value of our custom field.
 *
 * @param string   $value  Existing value
 * @param string   $key    Custom field key
 * @param bool     $linked Whether or not the parameter should be linked (used with taxonomies)
 * @param UBB_Book $book   Book object
 *
 * @return string
 */
function ubb_setting_get_value( $value, $key, $linked, $book ) {
	if ( $key != 'book_setting' ) {
		return $value;
	}

	return $book->get_meta_value( 'book_setting' );
}

add_filter( 'ubb/book/get_value', 'ubb_setting_get_value', 10, 4 );
Again, you can change the function names.
First, we perform a check for our custom field key. This ensures we’re only getting the value for our custom field, and not messing with other fields in UBB.
if ( $key != 'book_setting' ) {
Be sure to change that to your key.
Then, we use a really simple UBB method to easily get the value from the database.
return $book->get_meta_value( 'book_setting' );
Once again, that should be your custom field key.
And we’re done!
- Zip up your folder to create a zip file.
- Go to Plugins > Add New > Upload in your admin area and upload the zip file.
- Activate it.
- Go to Ultimate BB > Book Information and scroll down to the “Configuration” section. Drag your field into the “Enabled” column where you want it.
- Add/Edit a post and fill out your custom field (and other UBB book info).
- It should now show up on the front-end!
Download the final plugin
Of course I recommend creating your own, but you can download all my code to use as a guide.
This is really helpful, Ashley!
Very neat. No idea what I want to add, but appreciate the breakdown.
Awesome, very thorough walk through, thank you! I’ll definitely have a play around with some ideas and give this a go when I have some time!
Random question: Did you study coding at uni or is most of this self taught etc?
Completely self taught. 🙂
Wow! That’s pretty cool!
Oh my word, this is PERFECT! As the co-host of the Travel the World in Books Reading challenge, I had on my to do list to create a shortcode for book setting so I could add it to my reviews. Now I just need to figure out how to do the review index. You’re amazing Ashley and totally read my mind! Thank you, thank you!!
You’re so welcome! 🙂 Good luck!
Thanks for this awesome tutorial, Ashley! I changed one of the ones you already had (Sources) to use as characters, but this is even better. You’re the best.
You’re very welcome. 🙂
I did this and it worked great! Is there a way to make this a link to a directory like the other fields on UBB?
It is possible, but it involves a significant amount of more code because you’d have to create what’s called a custom taxonomy and use that instead of a custom text box.
In short, you’d have to write a bunch of extra code for registering the taxonomy, delete everything you did to add the custom text box to Edit Post, then rewrite the code from step 4.
Sadly it’s more than I can explain quickly here!
Thank you for this wonderful explanation. I just wanted to know how to add a field with stars, like rating for other aspects. Not the X-stars in words but with star images like rating. I couldn’t find how to do that.