
I’m going to walk you through how to create your own social media icons for your blog. You can create icons that match your design, even if just by using the colours in your palette. 🙂
Requirements
- Photoshop: I suppose this isn’t really required but my tutorial will be using Photoshop. However, similar results can always be achieved in different programs. But you may not be able to follow my instructions exactly.
- Internet access: Good news! If you’re reading this, you have it!
Step #1: Collect your icons
The first step is to collect the basic, raw, social media icons. By that I mean only the site logo without any background or design elements.
Decide which sites you want to make icons for, then download the icons. I personally use IconFinder for all my icon searches. You can search for the social media site you want (i.e. “twitter”), set the price to “Free”, and find a raw icon to download.
Example search:

To download the image, find a large copy (maybe 256×256 pixels or 64×64 pixels) and download the PNG version of the icon. It’s always better to start with large icons because you can always make them smaller at the end of the project. But if you start out too small, you can’t make them bigger!
So save the file to your computer, then repeat the process for all the sites you need icons for.
Step #2: Set up your Photoshop document
The next step is to create the background for the icons. I usually like to keep these pretty simple and just match the colours of the site I’m working with, but you can take whatever approach you want.
Open up Photoshop and create a large, new document. The document should be slightly larger than the size of the icons you downloaded. So if you downloaded the 256×256 icon, consider creating a document that’s somewhere between 260×260 and 300×300. Ultimately the size doesn’t matter because you can always make things smaller to fit.
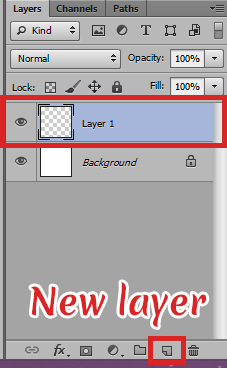
Next, create a new layer so that you’re not working on the “Background” layer.
Step #3: Create a simple background
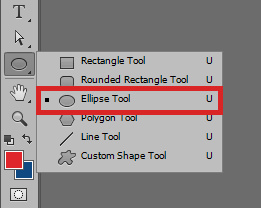
Next we can start by creating a simple, circular background for the icon to sit on. In the toolbar, switch to the Ellipse Tool. We’re going to use this to create a circle.
After activating the ellipse tool, click on the top colour in the toolbar (in the screenshot to the right, that would be the red colour) to open the colour palette. Select the colour you want your circular background to be. Don’t worry, you can change this later!
Next, look at the top bar in Photoshop and make sure your ellipse tool is set to Shape. By setting it to shape (instead of “path” or “pixels”) you will have a coloured background and be able to resize the circle later.
Then, next to the “Shape” dropdown, click the “Fill” colour and set it to the colour you selected from the palette (it should appear under “Recently used colours”).

Finally, you’re ready!
Creating the circle
Move your cursor into the center of the document. Click and start dragging your cursor outwards. As you do so, hold down “Shift” and “Alt” together. Holding down “Shift” will cause your circle to actually be a circle (instead of an oval). Holding “Alt” will cause the circle to be created from the center of your cursor (I find this easier). When you’re happy with your circle, release the mouse click to set it.
Centering the circle
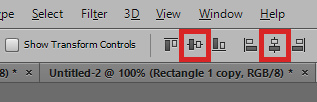
Sometimes your circle still won’t be perfectly center. To center it automatically, hit CTRL+A (or Apple+A on a Mac) to select all. Then switch to the Move Tool by hitting “V”. Then find the alignment options in the top toolbar. You can click each of the middle icons to align the circle vertically and horizontally.
Progress update
So here’s what my document looks like so far:

Now let’s put an icon in there!
Step #4: Add the icons
Next we’re going to put an icon in there! So grab one of your icons and paste it into the document in a new layer. Then resize it if necessary to fit inside the circle.

If you need to change the colour of the icon, you can easily do that. In the layer panel, make sure you have the icon selected. Then click the “Lock transparent pixels” icon.
![]()
Then set the foreground colour to the colour you want to change it to. Then hold the ALT key while you press Delete to apply the colour.
Step #5: Saving your icons
Make sure you repeat the same steps for adding all your other icons. Then you can save them!
First, you want to crop your document so that the circle goes all the way to the edges and that there’s no extra space. To do this, hit “C” on your keyboard to switch to the Crop Tool. Then drag the tool until so that the circle is right up against the edges, as shown below:
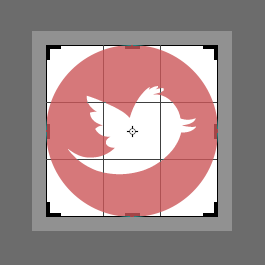
Then hit “Enter” to apply the crop.
Next, hide the white background layer so that your icons are transparent. Then go to File » Save for Web to start saving. On this screen you can resize your icons if necessary. I usually pick somewhere between 35 and 45 pixels for each icon, but you can play with it! Then just click “Save” when you’re done.
Rinse and repeat for each icon.
You’re done!
Check out my final result:
![]()
![]()
![]()
Get creative!
My tutorial focuses on using a simple circle for a background, but you can experiment! You can use different shapes or you can even experiment with brushes. There are no limits!
![]()
![]()
![]()
Example using a paint brush instead of a circle shape
Since you’re using Photoshop, you could use some free extensin, e. g. FlatIcon. You’d get thousands of free icons pasted right into Ps as vector object…
Thanks. 🙂
How the hell did I not know about IconFinder???????????????? Love this. So simple.
It’s awesome! I used to use it a ton. Now I mostly use Font Awesome for shape/object icons in web designs, but IconFinder is still super useful for other projects or logos.
Excellent! Very useful info. Thank you.
Woah! It’s more satisfying creating your own social media icons 😀
Absolutely! 😀
Cool tutorial! I made my social media buttons myself to, but I didn’t know that site (iconfinder) so I drew the icons myself in Photoshop, this would have been more useful for me, haha!
Wow, drawing them yourself is pretty impressive! I love how your icons turned out. 🙂
Love your bloggy posts like this, and I’ve always wondered how to do this!! Might need to play around with photoshop though, I’ve always wanted to but I have zero skills with that software. I guess on wordpress.com blogs you can’t really do this though? Silly question maybe, but I’m not sure how to actually put these in the sidebar in .com so that when you click on each individual one it would take you to the individual link, seeing as widgets and the like are one image with one destination URL… I’ve been contemplating looking into coding and whatnot a little more, seeing as it’s becoming such a massive deal and stumbled upon this https://www.thebookpeople.co.uk/webapp/wcs/stores/servlet/qs_product_tbp?productId=494778&storeId=10001&catalogId=10051&langId=100 which I thought was hilarious but also possibly useful – if a kid can understand it, it can’t be that difficult…
You can still do this on WordPress.com. 🙂 You just have to use HTML instead of an image widget to do it. You’d upload each of the icons into WordPress (Media » Add New), then create a new text widget and paste in this code for each icon:
Just replace the URL TO SOCIAL MEDIA PROFILE with the web address to your profile and IMAGE URL with the URL of the icon you uploaded.
Then you repeat that same code for each icon. 🙂
You are officially a genius!! I’m going to go play…. R x
This is awesome! Thanks! 😀
My pleasure. 🙂
A while back I had created icons for myself, but this way looks so much easier! I’m using ones someone else made with permission right now, but I’m bookmarking this for later. Thanks!
No problem! 😀
Ooh, this is the first time I’m hearing of IconFinder — thanks for sharing about it! I’m using the official Twitter logo for my Twitter button, and the rest I just googled and searched for under “Images” or created myself. This site will definitely come in handy, though!
Yeah Googling often does the trick too, but IconFinder can be useful if you need like 5 icons that are guaranteed to be good quality, large in size, or transparent. 🙂
This will be great for in the future if I ever get creative and want to play. Currently I have this really great web designer working on a new design for me. 😉
I’m thinking I really need to work with Photoshop because there seem to de endless possibilities that I could use for my posts as well as blog design. Thanks so much for this awesome tutorial!
Aw shucks. 🙂
Didn’t know iconfinder either!
I LOVE the icons you made for UBB plugin though. I use those ones. I just changed the colour and added Feedly.
You literally answers my prayers every time you post something that’s relevant to me. :D!
I love hearing that! 😀
I love this! This is so helpful, especially the icon finder thing. I made a few of mine on pic monkey, but I wasn’t totally satisfied. I think I’ll try again with this method, and with the paintbrushes so it’s all soft 🙂
Thank you for the tutorial! This will make my life ten times easier now when I go to make my icons for social media! 🙂
I’ve been so lazy lately, but I really want new social media icons.
It’s great that you’re doing more Photoshop related posts!
I’m trying my best. 🙂 If you have any topics you’d like to see let me know!
I’ve tried to do my own social icons, too, and they were’t bad, but this will make it so much better. The website is awesome as well, I have never heard of it which is strange in regards to how much I glean social icons.
THANK YOU for this post!!! actually the one information that I was missing was where to find the “raw” icons…and then I’ll see what I’ll to with them! Your post was the first that had this information! Thank you once again!
Hey, I loved this but I don’t know how to put it on blogspot, can you help me? Or it just works with themes that already came with a option to put the link of your social medias? Thanks already!
I didn’t know you could make them yourself! I always had to make do with the default WordPress icons… By the way, how did you make the icon white when the original was black?
I covered that in Step #4. 🙂