
Recently, I talked about why I have given up FeedBurner and how I have switched to MyMail for e-mail subscriptions. It seems like there was a fair amount of interest for a MyMail tutorial, so here it is! I’ll walk you through the steps of exporting your e-mail subscribers, setting up MyMail, connecting it with Amazon SES, importing your subscribers, and crafting “new post” e-mails!
Step 1: Purchase & install MyMail
MyMail is a premium plugin, but if you read my last post, you’ll see why this one-time purchase fee is significantly better than the alternatives (MailChimp, JetPack, etc.). You can purchase the plugin from CodeCanyon for $25 USD. Then, you will be able to download the plugin and install it on your blog just like any other plugin.
A different, free option is the Wysija Newsletters Plugin, however if you use that instead then this tutorial won’t be of much use to you!
Step 2: Configure your MyMail settings
Once it’s installed, navigate to Settings » Newsletter and start filling out your settings. Decide who you want the e-mails to be sent from, which e-mail address, etc. Fill out everything you can, but skip the “Delivery” tab for now, because we’ll configure that in a minute.
Step 3: Connecting with Amazon SES
This section is for people who are going to send e-mails through Amazon SES. Using MyMail, you will be sending e-mails through your own web hosting account. But if you have a lot of blog followers, you will probably be sending upwards of 10,000 e-mails per month! Your web host might not like that… Using Amazon SES enables you to avoid any problems with your web hosting by sending the e-mails through Amazon. It’s not a free service, but it is super cheap! Amazon charges you $0.10 per 1,000 e-mails.
But, if you’d rather not use Amazon SES, contact your web host and ask them if they have a limit on the amount of e-mails you can send per hour, day and/or per month. If there is no limit, you might want to send e-mails normally and skip this section! But most web hosts do have a limit and you DO NOT want to go over it (doing so could cause your account to be suspended).
Install the MyMail AmazonSES Integration plugin.
This plugin is a MyMail extension that allows you to seamlessly integrate your settings with Amazon SES. Just install it, activate it, and move onto the next step.
Sign up for Amazon Web Services
Amazon Web Services is what Amazon labels all of their web services and applications. Amazon SES is connected under Amazon Web Services, so first you have to sign up for Amazon Web Services.
Once you’ve done that, navigate to My Account/Console » AWS Management Console. Then, under App Services, click “SES E-Mail Sending Service” to be taken to Amazon SES.
Setting up verified e-mails
When you start out with Amazon SES, you’ll notice that you have strict sending limits (I think it’s 200 e-mails per 24 hour period). This is just because right now you have “sandbox” access. Eventually you will apply for production access, which will significantly increase your limits (i.e. right now my limits are 10,000 e-mails per 24 hour period). But we’ll get to that later!
For now, click on the “Verified Senders” tab. Until you get production access (which we’ll set up later, I promise!), you need to verify the e-mail address you will be sending from, and any e-mail address(es) you will be sending to. So for now, add the e-mail address you will be sending from, and another e-mail address that you can test receiving e-mails.
Configuring MyMail with Amazon SES
Now, go back to your blog and navigate to Settings » Newsletter and click on the “Delivery” tab. Then, near the bottom, click on the “AmazonSES” option. This option is here thanks to that MyMail AmazonSES Integration plugin we installed earlier! Notice how it says:
You need to create Access Keys to work with Amazon SES
Click that link and check to see if you have any access keys. If you don’t have any then you’ll need to create one. Copy the access key ID and paste it into the field in the plugin. Then click on “Show Secret Access Key” for that key, and paste that into the secret key field in the plugin. Also, check the box for “auto update send limits.”
Save your settings and make sure that it comes back green saying, “Your credentials are ok!” If not, it means that your access key and/or secret key was incorrect!
Recap: Where we’re at so far, and a summary of what’s next…
Summary of what we’ve done so far
We have the MyMail plugin installed, we have the Amazon SES account set up, but our limits are currently 200 e-mails per day because we don’t have production status. But we have two verified e-mails (one we can send from and one we can send to). We have set everything up just enough so that we can start testing.
What’s coming up
Once we set up our e-mail lists, templates, and campaigns, we’ll send test e-mails to ensure that everything is working properly. Once we’re happy with the format of our e-mails, our subscription lists, and our campaigns, we will apply for Amazon production access. Once that gets approved, we will import our e-mail list and our new subscription service will be 100% up and running!
Step 4: Set up your mailing list(s)
Next, navigate to Newsletter » Lists and set up the names of your mailing list(s). The default one is called WordPress Users, and I just ignored that because it has other uses. For example, if you allow people to register on your blog (so that they have their own login credentials) or have guest bloggers, this would be an easy way of adding all of your blog sign-in users to the list and mass e-mailing them with any updates or news. But that’s not something I’m interested in, so I left it alone. Here’s how I set up my lists:
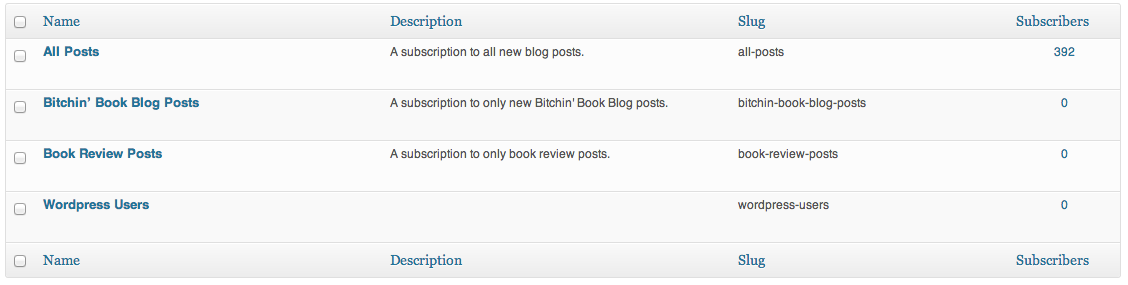
My ‘primary’ list is “All Posts” because that one will e-mail my subscribers with every new post. The other two (“Bitchin’ Book Blog Posts” and “Book Review Posts”) are category specific posts, which means people who subscribe to those lists only get posts from those categories!
You can set yours up however you want. I imagine most people will just want to have one list for receiving “All New Posts”.
Step 5: Create your first campaign
It’s time to create our first e-mail campaign!
It’s important to realize that there are two different kinds of newsletters in MyMail. You can create a “Regular Campaign” which is a manually written e-mail that will go out one time. You can schedule delivery in the same way that you can schedule posts. Or, there is the “Auto Responder”, which will automatically send an e-mail any time an event occurs. This is where we will set up the e-mails that automatically get sent whenever there is a new post.
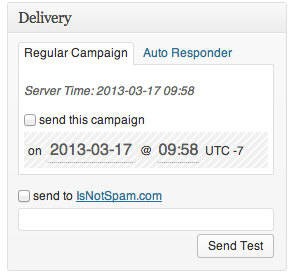
Regular Campaign
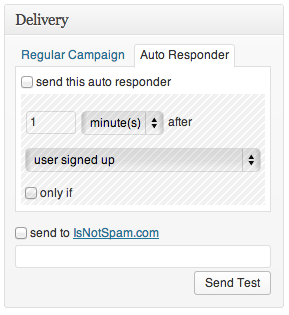
Auto Responder Campaign
On the auto responder tab, check “send this auto responder” and from the drop down menu, change the default (“user signed up”) to “something has been published.” Make sure “Post” is selected in the next section, so that it reads: “create a new campaign every time a new post has been published”. This is where you can also configure different categories. For example, if I were creating a list for only receiving Book Review posts, I would select, “only if in Reviews category”.
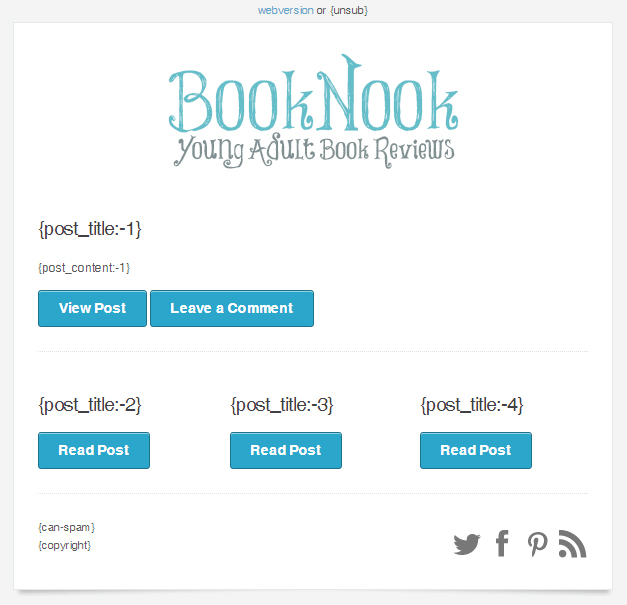
My E-Mail Template
Click to Enlarge
Fill in all the other fields for the campaign title, subject, from name, from e-mail, etc. Make sure the from e-mail is the one you verified with Amazon SES! Then you can also start drafting your e-mail template. Remember to use the tags in Settings » Newsletter » Tags.
So, if you’re creating a template to showcase your latest post, you will want to use dynamic tags like this:
{post_title:-1} _ Show post title for your most recent post
{post_content:-1} – Show post content for your most recent post
{post_link:-1} – The URL for your most recent post (you will have to put this in HTML link tags!)
You can also change the “-1” to other numbers. For example, if I want to show the post title for my second most recent post (not my most recent, but the one directly before that), I would put {post_title:-2}.
You can see an example of what my template looks like on the right.
Note about {post_content} and {post_excerpt}
By default, the plugin is set up to pull the RAW post content. This means it grabs whatever you put directly into the post box. So shortcodes will not get rendered out and will just appear as shortcodes, and anything you put into meta boxes (like the UBB plugin) will not get added in.
Similarly, the post excerpt is designed to only work if you manually write in an excerpt. It doesn’t use the excerpt automatically generated by WordPress.
Luckily, I found a way to fix this!
You can download my edited plugin file here:
You will have to overwrite an existing file in the plugin. This means that if the plugin ever gets updated, your changes probably won’t be saved and you will have to upload it again. Just download the file, then navigate to Plugins » Editor and select the MyMail plugin from the dropdown. Then, on the right, look for the file called myMail/classes/placeholder.class.php and click on it. This is the file you will be editing.
Open up my file in a text editor (like Notepad++ or TextWrangler) and copy everything in the file. Then go back to that myMail/classes/placeholder.class.php file, delete everything, and paste in the new content.
My edits will ensure that the PROCESSED post content is grabbed (so shortcodes will be properly rendered out and UBB book info will be included), and if you decide to use {post_excerpt:-1} it will use the excerpt automatically generated by WordPress so that you don’t have to manually fill them out!
Note for UBB Plugin Users (RE: Spoilers)
Spoiler using the UBB Plugin shortcode WILL get rendered out plainly in e-mails. However, there is a way to remove them. The reason the UBB Plugin won’t automatically remove them is because the plugin is set up to remove them from RSS feeds. But this newsletter is NOT an RSS feed.
The steps to remove them from MyMail might be a bit overwhelming if you don’t like coding or editing theme files, but here are the steps:
Step 1: Create A New Function
In your theme’s functions.php file, you have to create a new function. Add this code somewhere in your functions.php file:
/* Removing spoilers from MyMail Newsletters */
function ubb_remove_from_mymail($text) {
	$return = $text;
	$old_cwd = getcwd();
	chdir(dirname(__FILE__));
	require_once("QueryPath/QueryPath.php");
	chdir($old_cwd);
	$qpref = htmlqp($return, 'body');
	$qpref->find('.ubb-spoiler')->remove();
	$return = $qpref->top('body')->innerHtml();
	return $return;
}
Step 2: Edit the placeholder.class.php file
Next, you will have to make a few more edits to that same myMail/classes/placeholder.class.php as before. Using the EDITED version I provided, do a CTRL+F search for “cwbcontent”. This appears in a few places, so make sure you look for the segment that looks like this:
case 'content':
	$args=array(
	'p' => $post->ID,
	 'post_type' => 'post',
	  'post_status' => 'publish',
	  'posts_per_page' => 1,
	  'caller_get_posts'=> 1
	);
	$my_query = null;
	$my_query = new WP_Query($args);
	if( $my_query->have_posts() ) {
	  while ($my_query->have_posts()) : $my_query->the_post();
		$cwbcontent = get_the_content();
		$cwbcontent = apply_filters('the_content', $cwbcontent);
		$cwbcontent = str_replace(']]>', ']]>', $cwbcontent);
	  endwhile;
	}
	wp_reset_query();
	$replace_to = $cwbcontent;
	break;
We have to include our new function. Near the bottom, just after “wp_reset_query();” but BEFORE “$replace_to = $cwbcontent”, add in this line:
$cwbcontent = ubb_remove_from_mymail($cwbcontent);
Rinse and repeat
You will have to repeat this process a couple times, because that segment of code appears in several different places. Make sure you get them all!
To test whether it’s working, create a campaign with a post that uses the spoiler shortcode. View the campaign and see if the spoilers have been removed.
Step 6: Testing your campaign
Once you have your template all formatted and your campaign details filled out, it’s time to test it! On the left, under “Lists”, make sure you have one of your lists selected (right now the subscriber number should be zero, but select it anyway). Then save your campaign. Then, go to Newsletter » Autoresponder and you should see your campaign in that list. Hover over it and click “View”. This will give you a browser preview of your e-mail. Use this to check to make sure that your e-mail looks the way you want. Now, it’s time to test the actual e-mail!
Send test e-mail
Go back to Newsletter » Autoresponder and click on your campaign to edit it. On the right-hand-side, under Delivery, look for the button that says “Send Test”. Enter in your e-mail address in the box above (the e-mail you will be sending TO, that has been verified by Amazon) and click “Send Test”. This will send a copy of your campaign e-mail to that e-mail address. If you receive it, that means Amazon SES is configured correctly! If you don’t receive the e-mail then you will need to fix your Amazon SES configuration settings. But assuming everything went well, it’s time to apply for production access!
Step 7: Applying for Amazon SES Production Access
This should be pretty straightforward. If you go back to Amazon SES, there should be a big notice at the top saying that you don’t have production access, and I think there’s a link to where you apply. All you have to do is fill out some personal information and your website URL and press submit. You should hear back from Amazon within one business day (I heard back in less than 12 hours because it was early in the day on a Friday).
Once you get granted access, you no longer have to add e-mails to the Verified E-Mail List, and your sending limits should go WAY UP! Congratulations, you can now start sending out your campaign e-mails!
Step 8: Preparing for launch
Before importing all your subscribers and officially launching your new mailing system, I would recommend testing it “normally” for at least one day. Here are the steps I would recommend:
- Ensure that your campaign is formatted, finished, and properly saved.
- Temporarily add the newsletter sign up widget to your sidebar and sign yourself. (Side note: you can also do this manually as an admin in the admin panel under Newsletter » Subscribers, but I always think it’s good to test things as “a regular user” and this is how regular readers will be subscribing in the future!)
- Assuming you have confirmation enabled (highly recommended), confirm your e-mail subscription.
- Once you’re signed up, remove the widget from your sidebar (just because we haven’t officially launched yet!).
- Then, just sit tight. If all goes well, the next time you publish a post you should get an e-mail. This is your final opportunity to ensure that everything looks and is working the way it should.
Ultimately, with the test posts we sent earlier, the above steps aren’t 100% necessary. But I always say it’s a good idea to test things how a regular user would be using them.
Anyway, once you’re 100% happy with your campaign, it’s time to import all your subscribers!
Step 9: Exporting and importing your e-mail subscribers
To export your subscribers from FeedBurner, follow these steps:
- Go to http://feedburner.google.com/ and click on your blog.
- Click “See more about your subscribers.”
- Click on “FeedBurner Email Subscriptions” and then “Manage Your Email Subscriber List”.
- On that page you should have an option to “Export CSV”. Click that to download a CSV file of all your e-mail subscribers.
I think Jetpack has a similar option to export your subscribers as a CSV file, but I don’t know the exact steps!
Once you have your file, go back to your blog and navigate to Newsletter » Manage Subscribers. You can drag your CSV file directly into the “Upload” box. This will upload all of your subscribers! Make sure they get added to the right list. Then you can go to Newsletter » Subscribers just to confirm that everyone got added correctly.
Step 10: Deactivating your old service
Once you have switched over all your subscribers to MyMail, the courteous thing to do is to deactivate your old service. This way you don’t have to force your subscribers to manually unsubscribe from the old service (like FeedBurner). To deactivate FeedBurner e-mails, go back to your FeedBurner e-mail subscription management, and at the bottom you should see something that says:
This service is active Deactivate
Press “Deactivate” and you’re done! FeedBurner should still save your subscribers just in case you want to reactivate the service, but the e-mails will no longer get sent out.
Step 11: Aaaaand you’re live!
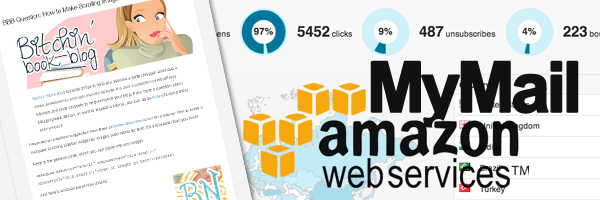
The last thing to do is to re-add the subscription widget to your sidebar so that your followers can sign up, and then you’re officially done! Your e-mails are getting sent out automatically every time you make a new post and you have access to all kinds of awesome statistics!
For example…
When you create an autoresponder, that template always remains in Newsletter » Autoresponder. But, every time the autoresponder sends out an e-mail, it creates a new file in Newsletter » All Campaigns. You can click on that campaign to see statistics about it. You will see:
- The e-mail subject
- The date the e-mail was sent
- The preheader
- The total number of recipients
- The amount of people who opened the e-mail
- The total clicks in the e-mail
- The number of people who unsubscribed when they got that e-mail
- The number of bounces (unsuccessfully sent e-mails)
- You will have access to a clickmap, which shows you which links in the e-mail people clicked on!
Are these statistics freaking awesome or what??
Possible Problem: E-Mails not sending
Just as a heads up, I’d like to share a problem I encountered where my newsletters weren’t getting sent our properly.
All kinds of “scheduling” in WordPress work with WP-Cron. This includes scheduling posts, sending out e-mail batches, and a few other features. How it works is, every time someone loads your website, WordPress loads WP-Cron, which checks to see if anything needs to be done (if a scheduled post needs to be published, or if an e-mail needs to get sent out, etc.). However, WP-Cron is not a real cron job. It’s a fake one (since it relies on someone actually visiting your site for it to trigger).
Anyway, my problem was that I set up my campaign to go out automatically and it worked fine for 2 days. Then, after that, my campaign got stuck on “will start in 1 minute”. For some reason the WP-Cron wasn’t triggering the e-mails. Even manually pressing “Send now” just wasn’t working. I eventually fixed this by replacing WP-Cron with real cron jobs. You can read a guide on how to do this here: How to Replace WordPress Cron With A Real Cron Job. I didn’t personally use that guide, but I basically did something similar so it should work. You might want to look into it if you experience the same problem. And, in general, using real cron jobs is much better.
Note: If your host doesn’t use cPanel then the instructions may not apply. But I can’t really write a guide that factors in every single host.
Extra tip: ensuring that your e-mails don’t look like spam
There are ways to test how likely your newsletter will get caught in a spam filter. IsNotSpam is a website that will analyze your e-mail and give you back a report.
Simply compose your email and send it to the following email address, using your usual mail server. You will be able to view an online report detailing potential problems (if any) with your email. Our software automatically checks the main elements which cause emails to be rejected by recipient mail servers. The following tests will be performed:
- SPF Check
- Sender-ID Check
- DomainKeys Check
- DKIM Check
- SpamAssassin Check
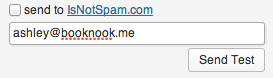
To run a report, go to your campaign and under “Delivery” look for the test e-mail box again. In the e-mail box, enter in check@isnotspam.com. Don’t actually check the “Send to IsNotSpam.com” box because I did that and never got a report. But if you manually put in the e-mail address it works great!
Then, after a few minutes, go to IsNotSpam.com and put your e-mail address in the box at the top (this should be the e-mail your campaigns get sent FROM). Click “Go” and you will have access to your reports! Ideally you want to pass everything!
I was going to do a more detailed guide on how to set all your anti-spam settings right, but honestly, it feels next to impossible. The problem is that the steps are different for everyone, depending on your set up, your host, etc. And on top of that, it’s pretty complicated in general. However, Amazon SES does have a pretty good guide on it. So I feel like the most I can do is point you in the direction of that guide and encourage you to look through it!
You rock! You know that right? 🙂 Just today I talk about Newsletter and Reading Preferences to soo how to generate the best newsletter for my readers.
Thank you so much for your help with all this! I’m looking forward finally testing my new Newsletter!
Hi Ashley,
Great post !, thank you, in fact the only one that gives out a little more information then the plugin’s own manual.
I bought the plugin a couple of weeks ago and since then it has been nothing but a trouble.
I am stuck on the Amazon SES setup and just can’t move on. There is no sensible information on integrating the Amazon SES with MyMail except your post and the developer doesn’t answer the support tickets. At all ! I am really angry.
I signed up for Amazon SES, got my emails verified, got my domain verified got even DKIM verified.
My sending limits are currently on 10 000 emails per 24 hours.
First of all the MyMail SES integration plugin has bugs. Sometimes when I login or just change some settings and try and send a test email, it would just cut out and say email not verified or check your SMTP. Well, i don’t use SMTP and all my emails are verified and even if not, it shouldn’t matter as my production limits are lifted.
All I have to do is disable and re-enable the plugin. Then it works just fine and the test emails is sent, it took me a while to figure this out, but now I know. Unfortunately this happens to often.
I create a campaign, the campaign sends, but it doesn’t seem like it is sending through AmazonSES, because when I login to my Amazon SES account, my limits are still full and sent emails read 0.
In the MyMail settings in the delivery tab, everything seems to be set up correctly, my credentials are ok, green light. Good to go.
The sending limits here in the settings actually update according to Amazon – 10 000 emails in a day.
When I send a test campaign, it seems that it is working as the send emails here in the settings > amazon ses delivery tab actually adjust according the the amount of emails I sent, but again, when I log in to Amazon, everything is still on 10 000, and it says 0 emails sent, like nothing ever happened.
The only think I could think of is that the other delivery methods are clashing with the Amazon SES setup. There are 4 delivery options available including the amazon ses.
Simple, SMTP, Gmail & Amazon SES
SMTP and Gmail are not filled with any information at all as I don’t use these. Amazon SES is filled with all the correct information, excluding the amazon SMTP.
I’m not sure if this also needs to be filled up if i use the Amazon API credentials, but tried it also, no change.
And the Simple option has to be filled with one of the available options :
1. Sendmail – Sendmail Path: /usr/sbin/sendmail
2. PHPs mail() function
3. QMail
It says “use the Simple delivery method option you don’t have access to a SMTP server or any other provided options”, but these are radio buttons, so one of the options must always be selected no matter if you have or haven’t got the access to SMTP or other options.
You obviously made this thing working, so would you have any suggestions at all ? What am I missing in my set up ?
Many Thanks, Suz
thanks for this great post 🙂
can this plugin integrated with optimized press?
Sorry but I’m not familiar with Optimized Press.
thanks ashley for the answer… 🙂
do you know what squeeze page plugin that integrated with my mail?
so that after someone sign up to my website using squeeze page i can send my newsletter quickly to my subscriber …
thanks again for your tutorial 🙂
Hello, Ashley!
I tried to edit the placeholder.class.php but when I overwrite the php with your code this error shows up when I try to test the autoresponder: Fatal error: Call to undefined method mymail_placeholder::set_campaign() in /home/content/plugins/myMail/classes/mymail.class.php on line 296
Sorry but the placeholder.class.php file isn’t updated for the latest version of MyMail.
Thank you for letting me know! Since I’m not *great* at this I thought I was doing something wrong!
“my campaign got stuck on “will start in 1 minute”
I have the same problem, i have visit the urls solution thaht you tell in the post, but it isn’t work me. What you did?
If you go to Settings » Newsletter » Cron, does it say the cron job is working?
I have disable wp_cron (i have done the same that say in the tutorial), in config.php i insert: define(‘DISABLE_WP_CRON’, true);
After i have configure in Cpanel the Cron. I click the secon option in newsletter-cron, and save.
And say me that wp-Cron is disabled and dont work.
If the “last hit” on the Cron page isn’t working then you haven’t set up the custom cron job correctly.
Hi Xavier, this is an old thread, but I wanted to see if you could solve the issue. I am under the impression that you have disabled the WP CRON but the real cron (in cpanel) was not configured properly. Did you add the cron URL to your cpanel account or the system crontab?
In my case, I found that using the real cron (not WP Cron) you get better results, plus it si more accurate in time.
I am moving from Mandrill to Amazon SES now, and using MyMail was a very good decision against other solutions. Although, I agree with Ashley that their lack of support is one of the downsides of this plugin.
Best Regards,
Thank for you help (sorry for my poor english)
The Cron Job set up correctly:
Ultimo hit: de 146.185.20.68, April 28, 2014 13:50, 1 min atras (Intervalo: 5 min / 0.5 sec, max 1.322 sec)
The campaing says that have been sent, but the emails adress that i have creat to test it don’t receive any. (the plugin says open 0/0)
Then you’ll have to contact the plugin developer and get his help.
Great info here – Thanks!
For Amazon SES, what settings are you using for Delivery? i.e.. Number of mails sent? Time between mails?
We were using 1000 emails (send max) and 10 in the time between mails field. For Amazon SES it worked well. What’s your experience on this?
Great post Ashley! I will be following your clear instructions when I set up my Amazon SES account. Thanks for taking the time to share 🙂
Good one. I have bulk emails (collected from my Gmail account), so is it ok to send through this system to market my new products?
In certain countries you need to have explicit permission to add someone to a marketing list. It doesn’t sound like you have permission if you just got the emails from “your Gmail account”. Make sure you follow the rules for your country.
hello ashley,..
thank you for share this article.
i would like to know about your opinion for mymail wp plugin nowadays.
because i’m considering to use it. and since you mention no longer used , i would like to know what about these days.
i don’t know much about newsletter, i’m still learn about this. what email marketing platform that you recommend? recently i run on a venue provider website. we had a lists of client mail, and consider to use more appropriate newsletter campaign platform.
thank you very much
*(sorry for my poor english)
“salam”